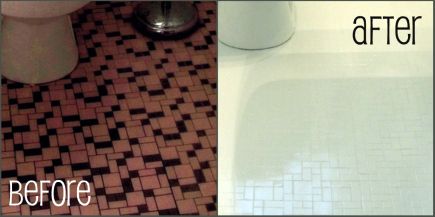
I’m finally getting closer to being finished!!
I’m hoping by the end of this week everything will be put together and I can do a grand reveal, but in the meantime here’s a sneak peek at my “new” tile floor!
We considered a couple of options before we decided on painting. First we thought we would rip out the original tile and put down new stuff, but that was a lot of mess, a lot of cost and a lot of work. Second we thought we would lay tile on top of the original tile but it would raise the floor above the threshold.
Then I discovered a ton of forum threads on painting tiles and it seemed like the perfect solution. Since it’s the floor in the downstairs bathroom it gets a decent amount of foot traffic, but not a ton. It doesn’t get wet often (except for the occasional sink spillage) and while it is washed frequently I rarely have to really scrub it so it won’t have too much wear and tear. I wouldn’t paint the tiles on the floor in my upstairs bathroom (lots of water) or my kitchen (tons of foot traffic), but for this tiny room it seemed perfect. We’ll see how it stands up!
It was really quite easy to do! The only drawback is that the oil based polyurethane gives a very slight yellowish tint to the enamel. It’s probably not noticeable to anyone but me, but it’s definitely there. A water based polyurethane (sometimes called polyacrylic) won’t yellow (or smell nearly as bad) but it’s not as durable either.
Step 1: Use a fine grit sandpaper to rough up the tile just a little bit. Don’t go crazy, you don’t want major scratches, just a little texture.
Step 2: Clean clean clean! I vacuumed the whole floor then scrubbed it down with a mixture of vinegar and baking soda. After that I used a damp soft cloth to rinse it clean a few times. And then one more careful vacuum for good measure.
Step 3-4: Prime away. It’s a bit smelly, but it’s good to use a good quality oil-based primer. I used Kilz. Apply it with a foam or very low nap/high quality roller. Make sure your roller isn’t leaving behind any little fuzzies. Apply in very thin coats and make sure that you don’t leave any ridges on the sides of the rollers. Put on two thin coats allow full drying time between each.
Step 5: Use a fine grit sandpaper (220 works well) and VERY lightly scuff up the floor. Use a clean damp cloth to wipe down the floor and wait for it to dry.
Step 6-8: Using a fresh roller (same high quality) apply thin coats of an oil-based enamel. I used a high-gloss white. Following the directions on the can let it dry/harden for the full length of time before repeating. Apply a total of 3 coats (or more depending on your preference).
Step 7-9: Using a third fresh layer or a high quality natural bristle paintbrush apply a clear polyurethane top coat. Warning: This stuff is ridiculously stinky. Make sure your room is really, really well ventilated. When applying the poly use very thin coats so it doesn’t pool in the grout (see my issue below). This can discolor the white enamel (I know this from experience). Again, wait the full drying time suggested and apply a total of 3 coats.
Step 10: Shut the door and wait! Following the directions on your poly give your floor proper time to cure before you walk on the floor!
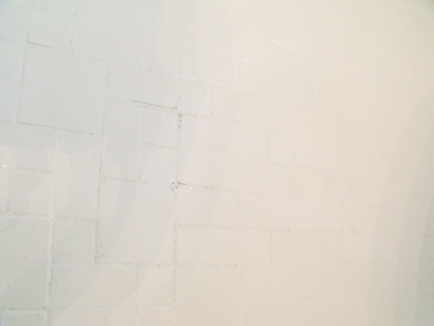
Now a bit of a confession… The picture of my new floor above is, in fact, what most of my floor looks like… except for this little section:
Can you see that nasty-ness? That came about like this (all of this is my internal dialogue… I have lots!)
“The floor is done! The floor is done!” (Happy Dance commence)
“Why does the grout look a little off-white in that area?” (Nose to floor)
“Oh no. It’s a pool of poly. Maybe just a little touch of paint will clear it up.” (Painting commences)
“Why does that paint look SO white…. why does the rest of the floor look SO yellow?!” (Realization that poly turns white yellow.)
“Okay… now just a little bit of poly.. whoops too much poly, I should wipe that off.” (Stare in horror after I realize it was a terrible idea to wipe wet poly with a terry cloth and watch all the fibers get stuck in the goop. General freaking out and floor scraping commences.)
So at this point I’ve let the floor dry completely and sanded out the fibers. I’m slowly building up the coats and it appears that it will blend in just fine. The first lesson: Apply poly VERY thinly and VERY carefully. The second lesson: Don’t wipe wet poly, that’s just stupid. The third lesson: Even if you make a mistake with this it can be fixed. Even if the spot fix doesn’t work I know that I can sand down the whole thing and add some more layers. More work? yes. More cost? yes. But it’s still an option!
Here’s the cost breakdown:
Rust Oleum White Oil Based Enamel: $13
Minwax Clear Coat Polyurethane: $10
Microfiber Roller -2 pack (x 2): $12
Grand Total: $42 (Compared to over $100 that I would have spent on tile!)
Plus there’s a lot of the primer, enamel and poly left for my future projects!


Looks great. I would have never thought of painting tile as an option. Good step by step description, too.
I noticed you posted this about a year ago. How has the paint held up? I’m thinking about doing this myself, but having only one bathroom, this will see a LOT of foot traffic, dampness from showers, etc. Thanks for the advice!!
Not well! I think that it maybe have been the quality of my paint job as well though, because I’ve heard great things from others who have tried it. But the paint blistered and peeled around the toilet and stained very easily from the jute rug I put in front of the toilet. That being said… I still consider it a big improvement from what was there and I can throw another coat of paint and poly on it every few years until I can afford to replace it. Good luck!